Art
Tip of the Brush: Sculpt Breakdown
February 7, 2023
Being a Character Artist is constantly both fun and challenging, whether you're interpreting someone's concept in 3D, redesigning a character, or optimizing existing assets (which is, of course, every Character Artist's favorite activity). There's a lot that goes into making a character, but my absolute favorite part of the pipeline has to be the rough, exploratory sculpt where we focus on shapes and proportions.
Regardless of starting point, I can pop in some music to chill to like lo-fi and get lost in a sculpt. When asked if I wanted to get involved with the company blog, my first thought went to speed sculpts, which is a great way to practice or sketch out an idea for yourself. I began with some TankGirl inspiration and the goal of a two-hour sculpt in ZBrush starting from a ZSpheres proxy. Unfortunately, the combination of recording software and ZBrush led to a crash, but I was able to recover my base proxy to start over.

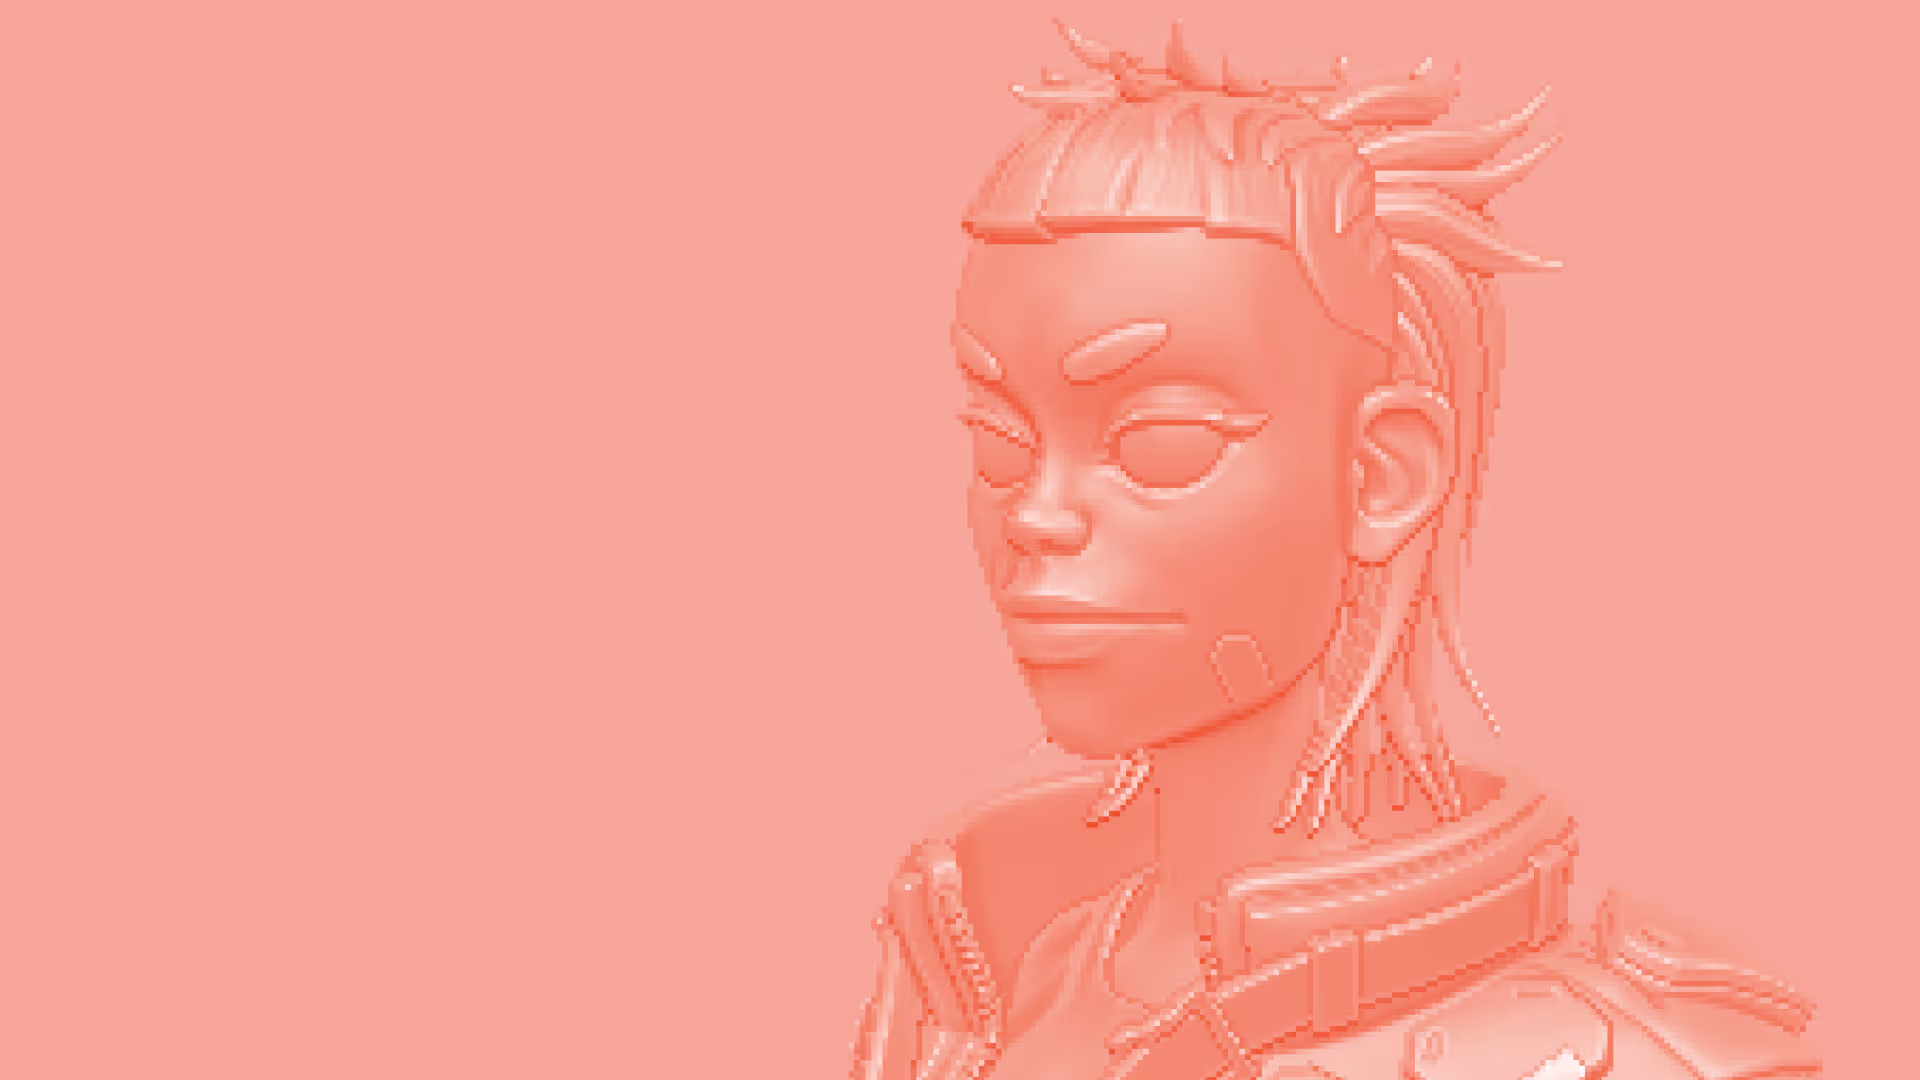
Head Sculpt
(~1.5 hours)
With images of Tank Girl crashing down on me, I knew I wanted to sculpt something similar, and the first thing to pop into my head was Yolandi Visser of hip-hop band Die Antwoord. This, plus all the cyberpunk content on the internet, made me think, "Hey, lets do some of that!" I used minimal reference to start and let the sculpt guide me from there.
I'm using ZBrush 2019 but have not yet utilized new features excepting the ZRemesher and the new folders. As mentioned, I used ZSpheres for the base, then applied Dynamesh and cleaned up the rough silhouette. I find it's easy to get lost playing with details, so my principle is "just put something there, you will play with it later." The main tools I use are: DamStandard, ClayBuildup, Move, and hPolish (I like to keep it simple).
I started with eye placement and scale, then roughed out the socket and shapes for the nose, lips, and jawline. At this point, I care less aboutwhat the features are, and more about placing some building blocks. I use Poly Groups often and Polish by Groups frequently (but mainly inareas I want flattened or creased). After blocking pieces in, I'll move them and reshape as needed. Then, I insert a cylinder for the ear, use Dynamesh until I get the desired shape, attach it, and blend it.
At first, I wasn't sure what I wanted for hair. I extracted her eyebrows and a skullcap to make a shape I could experiment with. I recalled YolandiVisser's awesome short bangs and mullet — if I could grow hair, I would totally rock a mullet — and used CurveMultiTube to build the hair, though in hindsight I should have used Fiber Mesh. Once I filled in the gaps, I decided that this is good enough for now.
Wait... this was supposed to be a two-hour sculpt?! Well, I had so much fun that I didn't want to stop, so I squeezed in several speed sculpts to put it all together.
Base Clothing
(1.5 hours)
Alright, time to get some clothes on her. To start, I masked out an area and extracted that piece from the mesh. Since I planned to give her ajacket, I only really cared about the teal area of the shirt. I used the transpose and move tool to get the desired fit, then DamStandard for creasesand folds. I don't care for realistic wrinkles, so I went for a stylized messy look.
I don't really care for realistic wrinkles for this piece and wanted a messy stylish approach. I extracted the teal polygroup and cleaned up the edges, which I did for the lower-body clothing as well.
Jacket
(1 hour)
To start the jacket, I used the same technique that I did on the shirt, masking out areas and reshaping until I achieved the initial form I wanted. I had little in mind outside of creating a thick jacket with a bulky collar. I applied Inflate Brush and DamStandard to carve wrinkles in diamond shapes, to later mask out folds I want to collapse or expand. Again, I'm looking for good, readable shapes over accuracy. I separated the sleeves, capped them, and smoothed the attach points so the chest pieces can be Dynameshed without causing the sleeves to weld into areasthey aren't supposed to. Finally, I extracted some bulky pieces on the shoulders, added some techy-looking pockets, and decided to wrap up this stage.
Shoes
(1.5 hours)
For the shoes, I used a pair of old Nike Jordan's for inspiration. With a blob of foot as my base, I masked out a tongue, then made a cavity for thefoot and tongue to rest in. Here, I used masks and Smooth by Group very heavily. I pulled out the sole, extracted a few elements, and applied ZSpheres to create the simple geo of the outer flaps, followed by ZModeler to form the laces. From here, it was just cleanup and minor details.
Geo Adjustments
(1.5 hours)
Now that most of the parts I wanted are in, it's time to tweak the geo. I started out by giving the jacket an inner lining and adding more details tothe hands and the legs. This is one place where cleaning up and having subdivisions can save you some heartache. After losing a bit of work, Imoved quickly through masking out and carving details into the hands.
Color and Refinement
(0.5 hours)
To bring it all together, let's toss on some color and a little more detail. I decided that the jacket needed a little something extra, so I pasted on a few straps and zippers, using ZSpheres and ZModeler to create the former. I didn't use too much of ZSpheres in this project, but people tend to think I'm crazy for doing (almost) all of my topology in ZBrush. Next, I created a nonfunctioning clasp and insert-meshed the zipper.Unfortunately, I forgot to record the last of my changes: adding more zippers, more details on the jacket, and glowing elements to the shoes.
Wrapping Up
Calling it! I had a lot of fun playing with this character. In the future, I might add some polish, or show you how I would do ZBrush topology on her. Thanks for watching and reading!


